Hello again! To start off today, I’d first like to apologize to any actual followers I might have for the delay since my last post. In addition to still getting used to blogging, as we all, the world can get pretty chaotic and busy. Luckily, things have finally settled down and now I can get back into this thing. I’ve been looking forward to this post for some time now. With having the chance to break in my new Dev Environment during my last post, I’m excited to put it to good use. My plan for this approach is to start with pipeline Basics (Overview, basic usae) followed by some more advanced concepts and concluding with a script related to the commands used in the examples.
Pipeline Basics
Anyone who uses Powershell is likely aware of piping and/or using the pipeline. For those unfamiliar, Powershell functionality allows a user to pipe objects between or after commands enabling them to be interacted with. For example, let’s say you want to run a command to check the processes on a given computer. This can be performed easily by using the Get-Process command. However, in doing so, the information returned data can be a little overwhelming.
On a given computer, there can be 100’s of processes and/or sub processes running with a variety of different names. You could try to specify that you only want processes containing a given string or letter but that could pose a problem if you don’t know the name of the process. In fact, I’m willing to bet that I could not name more than 5-10 process names. However, let’s consider why someone would need to look at processes. It’s safe to bet that there’s a 99% chance that the reason a person needs to investigate processes is troubleshooting related. This means that it’s likely that one of the following two scenarios will occur.
- Find a specific process to close it
- Identify which process or processes are utilizing all of the CPU
Here’s where Powershell really shakes its money-maker. With piping, we can tell the shell what data we want returned or how we want it returned. Let’s start with some basic interaction with the Get-Process command.

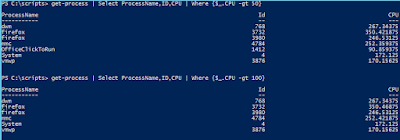
Using the Select function allows us to specify which parts of the object we want returned. In this case, we’re telling to select only the Process Name, the Process ID, and how much CPU is being used by all processes. However, what would be even more useful, is if we could specify exactly which processes we wanted to see and even change how the return data is displayed…

Boom! Not bad eh?
No, I’m kidding. In all seriousness, even basic piping can be incredibly useful to any admin. Even with just a few tweaks to a command, we’re able to search for a specific process, provided we already know the name or at least part of the name but what if we didn’t know the name? To do so, we’ll need to jump into some more advanced pipeline usage.
“Advanced” Pipeline Usage
I used quotes around the word advanced because I don’t necessarily consider myself to be at the level where I’m capable of teaching “advanced” concepts. That said, in comparison to my last few examples, I think that the following illustrations will qualify. The previous examples centered around isolating and identifying process information. Now, if we want to get the information we seek, we’re going to need to do some sorting. First let’s figure out which processes are actually using CPU.

That really shortened the list of processes and we can narrow it down even more by raising our CPU threshold.

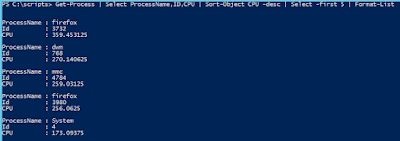
Time for some clean up and sorting.

Isn’t that pretty? The top 5 processes utilizing the CPU and sorted by CPU usage. This is only a microcosm of what you can do with piping. If you’re doing something with Powershell and an object is involved, that’s all you need to play in the pipeline.
The Finale
To wrap up this post, I’m going to leave with you with a small script I’ve written for checking the top 5 processes using up the CPU from a remote machine. One thing to note, when it comes to working with processes on a remote machine, there is a bit of a hiccup. The Get-Process command only allows for viewing CPU usage of processes on a local machine only. To mitigate this, I’ve taken a different approach to obtaining the process info using Get-WMIObject. For obvious reasons, I’m pretty sure a link to code is not needed. Here it is in it’s entirety…

And the result..

Easy Peasy!
Stay tuned for my next post during which I will be discussing and demonstrating Git usage. I would say that I’m looking forward to it simply because it’s interesting but I actually am in dire need of learning a little bit more about interacting with Git through the command line. To date, I’ve only been using the desktop app and from what I hear it has become my understanding that “I’ve been killing you smalls, I’m doing it all wrong”.